Author: Allie Jarratt

Where have I been?  And please enjoy some warm lentil salad topped with poached egg.

Where have I been? And please enjoy some warm lentil salad topped with poached egg.

  Hello!  Sincere apologies for my absence.  I needed to take a break from blogging.  The reason?  Because I had started heaping pressure on myself, setting expectations about perfect photos, on-trend and original recipes, and copious tweets and followers.  This diminished my enjoyment of Lick 

Make cake, not war

Make cake, not war

Happy 2017 everyone!  I think we can all agree that the year we have just ushered out was rather bruising, whether you’re talking politically, artistically, or for many of us, personally.  So, what we really need to ring in the New Year is not cucumber sticks, 

Edmond’s Cookbook Apple Sauce

img_8269

Pork and porridge.  It’s not too often you get these two together, but they are both delicious with a little applesauce, no?

Admittedly, my first thought on arriving at Apple Sauce in the Edmonds Cookbook (apart from no, not more apples) was ho-hum.  Apple sauce eh?  What can you do with that? It looks a bit like snot, therefore not particularly photogenic.  There’s not a lot of excitement in making it either.


This was all a little unfair and some internet browsing has piqued my interest.  Preparing apple-based sauces goes back to medieval Europe and many cuisines have their own version.  Check out this recipe for Norwegian apple sauce with rye cinnamon crumbs and yoghurt.  Oh my, wouldn’t that be a lovely sight to greet you for breakfast!  Or, this recipe for Danish applesauce (‘æblegrød’) with cream!

So you can imagine I embarked on my Applesauce with a little more excitement after this.  It’s very easy  and a very good way to use up any apples that are past their best and loitering in the fruit bowl.  I’ve been enjoying it with my morning oats, greek yoghurt and a little dusting of cinnamon, which is a very nice way to start the day indeed.

img_8286

Ingredients:

  • 3-4 apples, peeled and cored
  • 1 T water
  • 1 T butter
  • 2 cloves or some lemon juice
  • Sugar

Put all ingredients in a pan and simmer over a low heat, until the apples are ‘pulped.’   I have not come across this expression before, so I took it to mean ‘mushy’!

At this point, Edmonds instructs beating it with a fork until smooth.  Being a softer City-girl, I used a stick blender rather than a fork and elbow grease, which gave a nice smooth finish.

This keeps well in the fridge for several days, covered with a little cling film.


Russian fudge

If you fancy a sugar hangover, look no further.  This fudge is mouth-suckingly sweet and all the better for it.  A firm Kiwi favourite, it is dense and rich, comprised largely of sugar, sweetened condensed milk and golden syrup. I can’t get to the bottom 

Cinnamon & pear muffins

Cinnamon & pear muffins

I’m finding myself with a lot of tinned goods recently, not unlike many people in our little shaky isles in the wake of our 7.8 earthquake.  It pays to be prepared. I’ve heard the comment more than once that tinned pears are the least exciting 

Homemade Hundreds and Thousands biscuits

img_7813

Toddlers and sugar, a match made in heaven?  Probably not for their parents, but when it’s your niece’s third birthday party and you said you’d make biscuits, it’s hardly time to skimp on the sugar.

img_0539-jpg

I was inspired to make these little numbers by one of New Zealand’s favourite cookie treats…the Hundreds and Thousands biscuit.  The name is pretty self-evident, although perhaps not if you hail from elsewhere in the world outside of New Zealand.  ‘Hundreds and Thousands’ is our antipodean name for the rainbow sprinkles on top of these cookies, but other terms include nonpareils and jimmies.

img_7809

I can’t find must history about this biscuit itself, but there are a few stories behind the origins of Hundreds and Thousands.  Some claim they were invented in a New York candy factory in the 1930s, whilst others say that they come from Parisian bakers.

Whatever the origin, it can’t be denied that a liberal sprinkling of on a pink-iced vanilla cookie is an appropriate party treat.  I used Donna Hay’s vanilla snaps recipe for the base and the rest was pretty simple.

Vanilla biscuits:

  • 250g butter
  • 3/4 cup caster sugar
  • 2 t vanilla extract
  • 1 egg yolk
  • 2 & 1/4 cups plain flour, sifted

Icing:

  • 1/3 cup softened butter
  • 1 & 1/2 cup icing sugar
  • Pink food colouring
  • Strawberry essence
  • Hundreds and Thousands / Sprinkles / Jimmies or whatever you call them!

Beat the butter and sugar together until pale and creamy.  And the vanilla extract and egg yolk and beat again.

Finally add the flour and beat until a dough forms.  Wrap the dough in cling film and refrigerate for 30 minutes.


Heat the oven to 180 degrees celsius.  Roll the dough on a lightly floured surface until 3mm thick.

Cut rounds or shapes from the dough and place on baking-paper lined trays.  Bake until just golden – this took ten minutes in my oven.

Cool on racks.  Make the icing by adding the icing sugar to the butter, a drop of colouring and strawberry essence and beating well, using a little hot water to soften as needed.   When cold, ice with pink icing and sprinkle liberally with hundreds and thousands.

img_7819

Kisir, via Bromley

Catching up is an excellent excuse for eating. I’ve been away having numerous catch-ups and visiting some favourite old haunts. London is a favourite old haunt and feels a little like a second home, in no small part because of the many fabulous people living 

Edmond’s apple steamed pudding

Steamed pudding is like a sweet, jammy hug in a bowl.  I love it.  It’s a special favourite in our little country.  I was recently introduced to a New Zealand specialty steamed pudding which is the queen of both steamed puddings and now of my heart…burnt 

Beef and cabbage potstickers

img_3030

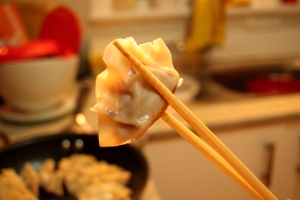
Oh, my mouth waters at the merest mention of potstickers!  Delicious, plump little morsels, steaming hot and so satisfying.  Their real name is Jiaozi, particularly popular during Chinese New Year.  In my house, we don’t wait for New Year.  They are popular year-round.

img_3012

I’ve been an enthusiastic consumer for many years now, but a recent convert to making my own.  I shied away from DIY potstickers, convinced they would be the kind of fiddly, tricky enterprise that leaves the cook hot, bothered, grumpy and worst of all, without a meal at the end of it.

img_3021

But trust me, they are quite simple and so rewarding.  I find making potstickers pleasantly meditative once I get into the swing of it, letting my thoughts wander while I shape and pinch the little parcels.

You will need:

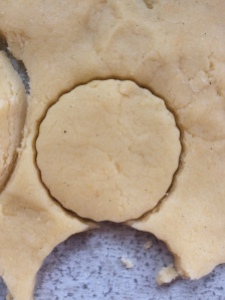
  • Potsticker skins – any Asian grocery will have them
  • 150g cabbage, chopped finely
  • 250g minced beef
  • 2 garlic cloves, grated
  • 1 T fresh ginger, grated
  • 2 T soy sauce
  • 1 t brown sugar
  • 1/2 t seasame oil
  • Freshly ground black pepper

For the dipping sauce:

  • 2 T soy sauce
  • 2 T rice wine vinegar
  • Drop of sesame oil

Lightly cook the cabbage in boiling water, just until it is softened, so that it is not too aggressive in the final product.  Drain and place in a large bowl.  Add the rest of the ingredients and mix well, using your hands if you’re not too squeamish about it.

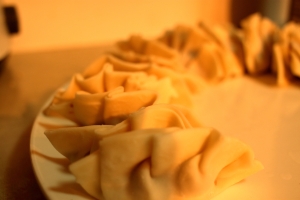
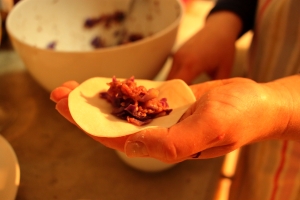
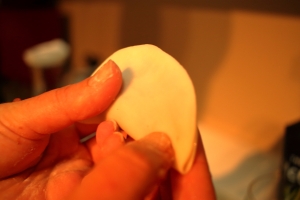
Hold a potsticker skin in your palm.  Dip your finger in water and run around the edges of the skin. Add one teaspoon of beef mixture to the top half of the skin and fold the other half over it, pressing the edges together.

img_3000

There is a special way to crimp the edges so they look pretty –  this fabulous video does a fantastic job of explaining the whole process;  if you want to skip to the crimping technique, it’s 5.05 minutes in.

img_3005

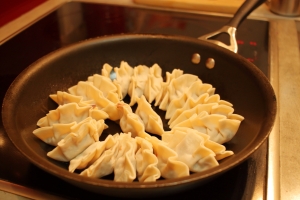
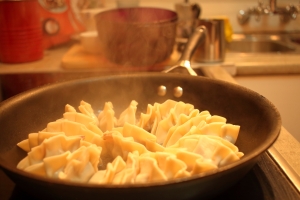
Once they are ready to cook, heat a little vegetable oil in a non-stick frying pan.  And please, do use non-stick.  I have learned this the hard way.  There is nothing worse than potstickers who take their name far too literally, so well and truly stuck you can’t eat them.

Place the potstickers into the pan and leave for a minute or two, until they are just slightly browned on the bottom.  Pour 150 mls warm water into the pan, down the side.  Put a lid of the saucepan and let the potstickers steam until cooked, about six minutes.  Take the lid off and let the bottoms crisp up for about a minute.

img_3026

Combine the dipping sauce ingredients and serve with rice and steamed greens.


Chocolate-espresso shortbread

Chocolate-espresso shortbread

I was the happy competitor in a baking competition recently.  I say ‘happy’ because how could you ever not be happy when you have a genuine excuse to make sweet delicious treats several times over?  And the competition was for a great cause too…Good Bitches